The Playlist view lists the contents of the current playlist, ordered by relative start time, as in this example:
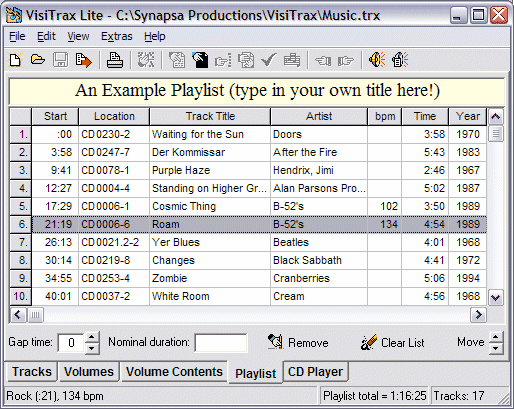
Each track's location index is listed as shown for quick manual access, along with its relative start time. The first entry always has a start time of ":00".
You can add (i.e. duplicate) or remove tracks in this view the same way you can elsewhere (see Playlists). The Remove button also will remove the currently highlighted track, and the Clear List button will clear the entire playlist.
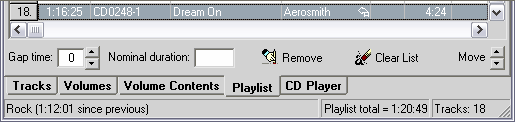
Any duplicate track will be annotated with one or more "replay" arrows in the rightmost variable-width column (the Artist column in this example), with the status bar showing the scheduled time interval since the previous play of that track, as shown here:
You can rearrange tracks in your playlist by:
| • | dragging rows up or down by their leftmost "button" cells, |
| • | clicking on the Move arrows, or |
| • | holding down the Alt key and pressing the up-arrow or down-arrow key. |
You can use the Gap time field to set the estimated nominal gap time in seconds between playlist tracks, so that (for example) the total time scheduled can include a two-second gap between tracks.
Shortcut: Pressing a digit key will change the gap time accordingly, from anywhere in this view except in the heading area.
The Nominal duration field is useful when scheduling a program of a specific duration. If you enter the nominal program duration into this field, the status bar will display Playlist remaining time instead of Playlist total time. For example, enter "2:00" for a two-hour program (you could also enter "120" minutes, which would be converted automatically to "2:00"). If the total playlist time exceeds the nominal duration, the status bar will display the excess time as Playlist OVERTIME.
Additional Data Columns
The Playlist view includes many additional data columns that you don't normally see. To access these additional columns, simply scroll to the right using the horizontal scroll bar at the bottom of the listing. These additional columns are always available, and you are free to move any columns in or out of the main set. For more information on how to do this, see Changing Which Columns You See.
Changing the Playlist Title
You can customize the title that appears at the top of the Playlist view, and on printed playlists, by typing directly into the heading field above the playlist grid. You can also change the font and coloring of the displayed title via the right-click menu.
Saving and Recalling Playlists
To save a playlist for later use, select Save Playlist... from the File menu. The complete playlist, including the title, will be saved to the .vxp file you specify.
To recall a previously-saved playlist, select Recall Playlist... from the File menu.
Playing MP3 and other Audio Files
The two toolbar buttons shown below are used for playing MP3 or other audio files:
| If the currently highlighted track is linked to an MP3 or other audio file, clicking this button will initiate play of that file – either by Winamp v5 (if installed), or by the file's associated media player program (if applicable) |
| This button will appear only if Winamp v5 is installed on your PC, and applies only to the Playlist view. If any listed tracks are linked to audio files, clicking on this button will add those files to Winamp's playlist, and Winamp will begin playing them (if it's not already playing something). Duplicate tracks preceding the new set will be removed from Winamp's current playlist. |
Converting a Playlist into a New Volume
One use for playlists is for to facilitate recording custom tapes or CDs, which themselves may need to be entered into your library as new volumes. To quickly convert a playlist into a volume, ensure that the listed tracks are ordered the way they were recorded, then select Convert Playlist to Volume... from either the Edit menu or the right-click pop-up menu. At this point you will be presented with a Convert Playlist to New Volume dialog, which is used just like Adding a New Volume, except that the current playlist's tracks will be included automatically, numbered in sequence.
| See also: | View Options and Customization |